A dropped coal from a shisha pipe or a misplaced hot pan can leave an unsightly scorch mark on your pristine wood floor, creating immediate anxiety about project handovers or the loss of a security deposit. The conventional response is often a full plank replacement-a costly and disruptive endeavor in the UAE that can run into thousands of Dirhams. However, this expensive route is rarely the only or most effective solution for rectifying the damage.
This specialist guide provides the technical knowledge required to professionally fix burn mark on wood floor surfaces. We will detail the exact methods for assessing the severity of the damage, from superficial discolouration to deep charring. You will learn the innovative restoration techniques our technicians use to achieve a flawless, invisible repair, helping you avoid the high costs and delays of replacement and ensuring your floor is restored to its original, exceptional condition.
Key Takeaways
- Differentiate between surface-level scorch marks and deep char damage to determine the correct restoration approach for your floor.
- Discover why DIY sanding can worsen the damage and when professional restoration is the most cost-effective solution to fix a burn mark on a wood floor, avoiding costly plank replacement.
- Learn the correct DIY methodology to safely fix a burn mark on a wood floor, focusing on minor scorches that can be addressed without specialist equipment.
- Explore advanced techniques specialists use to fix a burn mark on a wood floor, including the application of structural resins to rectify deep char damage and restore the wood’s integrity.
Understanding Wood Floor Burn Damage: Scorch vs. Char
A burn mark on your wood floor is more than just a cosmetic issue; it’s thermal damage that compromises both the protective finish and, potentially, the wood grain itself. In UAE households, the most frequent culprits are fallen shisha coals, dropped clothing irons, or electrical faults from appliances. To effectively fix a burn mark on your wood floor, it is crucial to first assess the extent of the damage. Immediate action is required, as a compromised finish exposes the raw wood fibres beneath, making them highly susceptible to moisture ingress, which can lead to swelling, staining, and more complex structural problems.
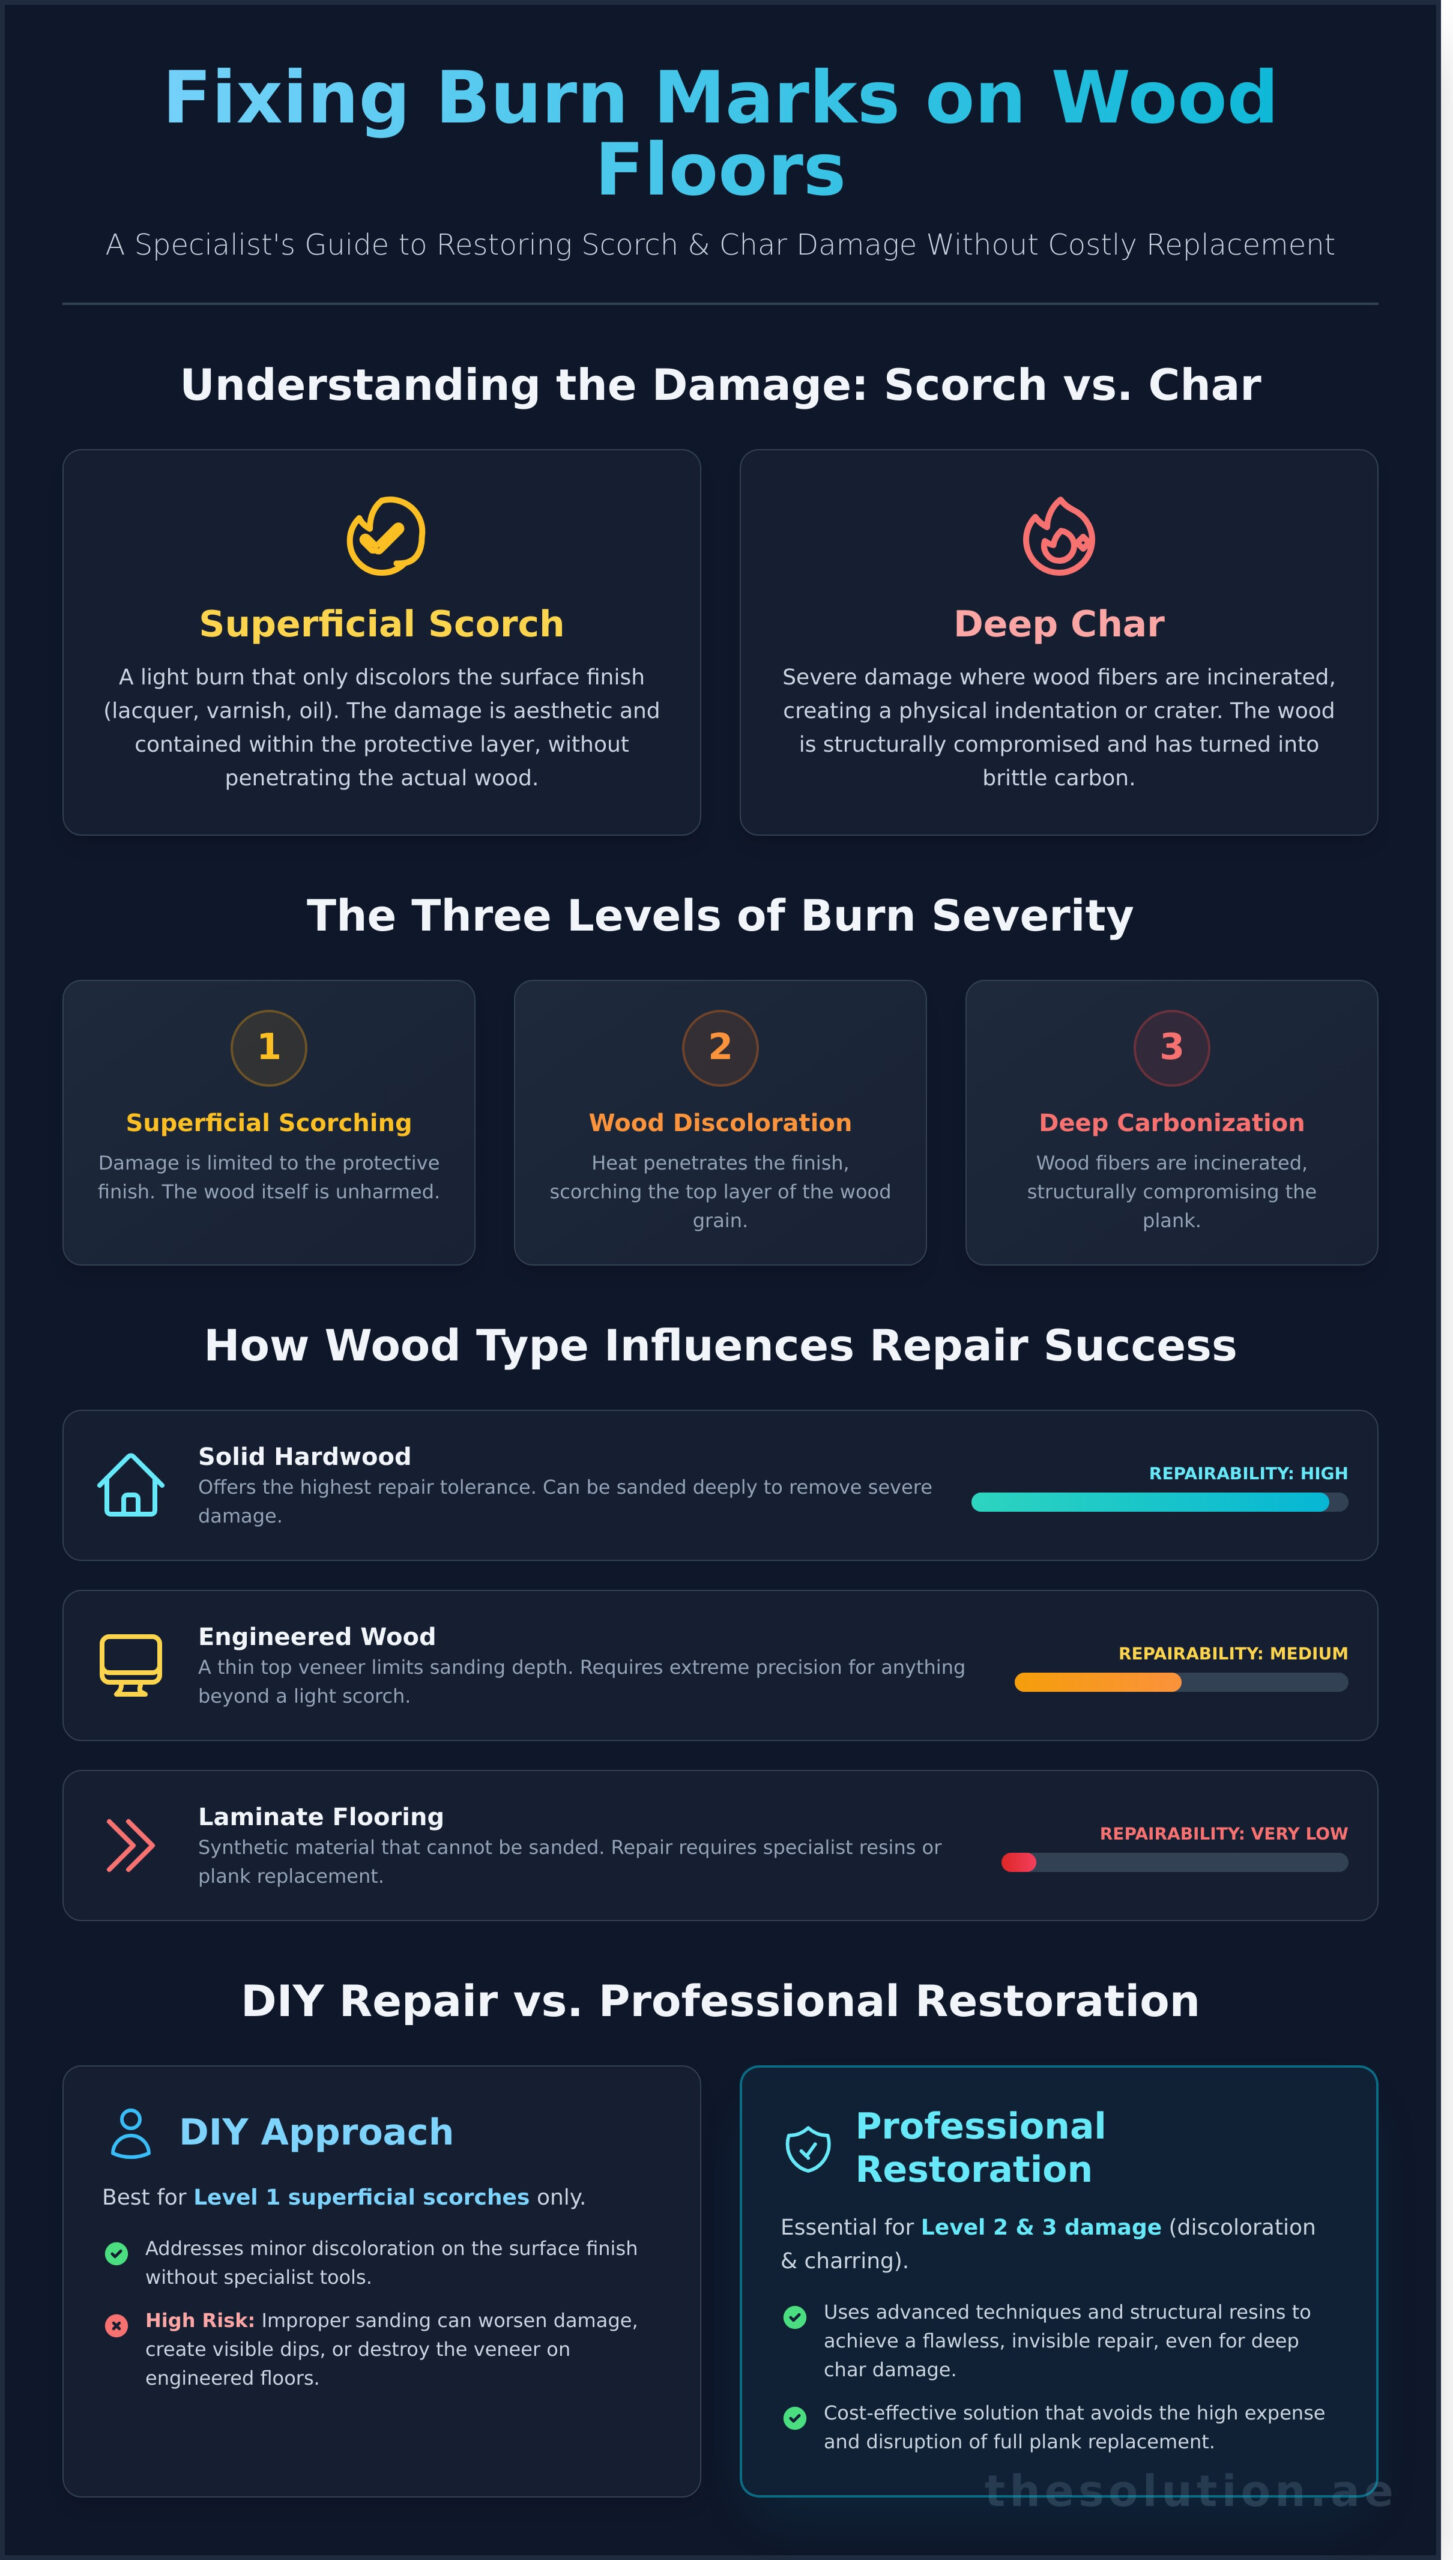
The type of damage-a superficial scorch versus a deep char-and the flooring material itself will dictate the correct repair methodology. A scorch mark may only affect the top sealant, while a char indicates the wood itself has been carbonized.
The Three Levels of Burn Severity
A proficient damage assessment is the first step in any successful restoration. We classify burn damage into three distinct levels of severity, each requiring a specific technical approach:
- Level 1: Superficial Scorching. This is a light burn that has only discoloured the surface lacquer, varnish, or oil finish without penetrating the wood. The damage is purely aesthetic and contained within the protective layer.
- Level 2: Wood Discoloration. The heat has penetrated the finish and has started to scorch the top layer of the actual wood grain. This results in a dark brown or black stain that is physically part of the timber.
- Level 3: Deep Carbonization (Charring). This is severe damage where the wood fibres have been incinerated, creating a physical indentation, crater, or hole. The wood is structurally compromised and has turned to brittle carbon.
How Wood Type Influences Repair Success
The composition of your flooring is a critical factor in determining the viability and method of repair. A comprehensive grasp of understanding wood finishes and material composition is essential before attempting any restoration work.
- Solid Hardwood: Offers the highest tolerance for repair. Its thickness allows for aggressive sanding to remove deep scorch marks and even moderate charring before refinishing, making a near-perfect restoration possible.
- Engineered Wood: Comprises a thin top veneer of real wood over a composite core. This construction severely limits the depth of sanding possible. Rectifying anything beyond a superficial scorch requires extreme precision to avoid sanding through the veneer entirely.
- Laminate Flooring: This is a synthetic product with a photographic image layer protected by a clear wear layer. It cannot be sanded. Any attempt to do so will destroy the image layer, making the damage worse. A burn on laminate necessitates either plank replacement or repair using specialist resins and compounds.
The Science of Wood Carbonization and Surface Finishes
To effectively fix a burn mark on a wood floor, one must first understand the underlying damage at a molecular level. The black or dark brown discolouration is not a simple stain; it is the result of carbonization. Carbonization is the permanent thermal breakdown of wood fibers. This chemical reaction, triggered by intense heat, irreversibly alters the wood’s core components-cellulose and lignin-transforming them into the black carbon deposits you see. For a successful restoration, these damaged, carbonized layers must be physically removed, not just concealed.
The floor’s finish serves as a protective envelope, and its specific composition dictates how it reacts to heat, influencing the repair strategy. Common finishes include:
- Polyurethane & Lacquer: These create a hard, plastic-like film on the wood’s surface. Heat will first melt or blister this top layer before reaching the wood, often requiring a multi-stage repair of both the finish and the timber.
- Penetrating Oils & Hardwax Oils: These finishes soak into the wood grain itself. While they enhance the natural look, they offer less surface protection from direct heat, often allowing the wood to scorch more quickly and deeply.
Thermal Shock and Wood Expansion
The sudden, intense heat from a dropped item causes “thermal shock,” forcing moisture out of the wood cells and causing them to collapse or “cup.” This can create a permanent indentation. In Dubai’s consistently air-conditioned environments, wood maintains a specific, low moisture content. Any repair must be meticulously acclimated to this unique climate to account for the wood’s natural expansion and contraction, preventing future gaps or pressure ridges around the repaired area.
Chemical Reactions with Modern Finishes
Heat can trigger adverse chemical reactions in modern finishes. For example, certain lacquers will develop a milky-white “blush” as the rapid heating and cooling traps moisture within the finish. While a basic sanding process, like the one in this Ask This Old House tutorial, can rectify very minor surface scorches, it cannot address these chemical changes or the challenge of matching modern finishes. Many high-end apartments in the UAE feature factory-applied, UV-cured finishes that are exceptionally difficult to replicate on-site, requiring specialist techniques for a seamless blend.
Furthermore, the high-traffic conditions common in Dubai homes and commercial spaces will quickly expose a poorly integrated repair, as it will wear at a different rate than the original flooring. This makes professional execution critical for a durable, invisible result.
DIY Repair vs. Professional Restoration: Making the Choice
The most common question property managers ask is, “Can I just sand it out myself?” While the initiative is understandable, attempting to fix a burn mark on a wood floor without professional expertise is a significant risk. An amateur repair often results in a “halo effect”-a noticeable patch where the finish, colour, and texture do not perfectly match the surrounding area, making the repair more conspicuous than the original damage.
A cost-benefit analysis is essential. A DIY kit may cost between 75 د.إ and 150 د.إ, but a failed attempt can lead to a much larger, more costly correction. Professional restoration by The Solution not only guarantees a seamless result but also provides savings of 50-80% compared to the alternative of replacing the damaged plank. This makes professional intervention the most financially prudent choice for all but the most minor imperfections.
When to Attempt a DIY Fix
A DIY approach should only be considered under very specific conditions. The damage must be entirely superficial (no charring or depth) and smaller than a 1-dirham coin. The process requires fine-grit sandpaper, mineral spirits for cleaning, and a perfectly matched wood stain and finish. Be especially cautious with engineered flooring, as its thin wood veneer can be easily sanded through, causing irreparable damage.
When to Call The Solution
Engaging a specialist is the mandatory course of action for more significant damage. Our technicians are required when:
- The burn has created a deep hole or charring that requires specialist structural filler to rebuild the surface.
- The floor has a high-gloss or satin finish, where even the slightest imperfection in the repair will be highly visible.
- The repair is part of a construction handover or property inspection where flawless, undetectable results are non-negotiable.
In nearly all cases, our innovative techniques can fully rectify the damage without resorting to replacement. Full plank replacement is a costly, disruptive, and rarely necessary procedure when The Solution’s advanced restoration methods are employed to fix a burn mark on a wood floor.
Step-by-Step Guide: Fixing Minor Scorch Marks
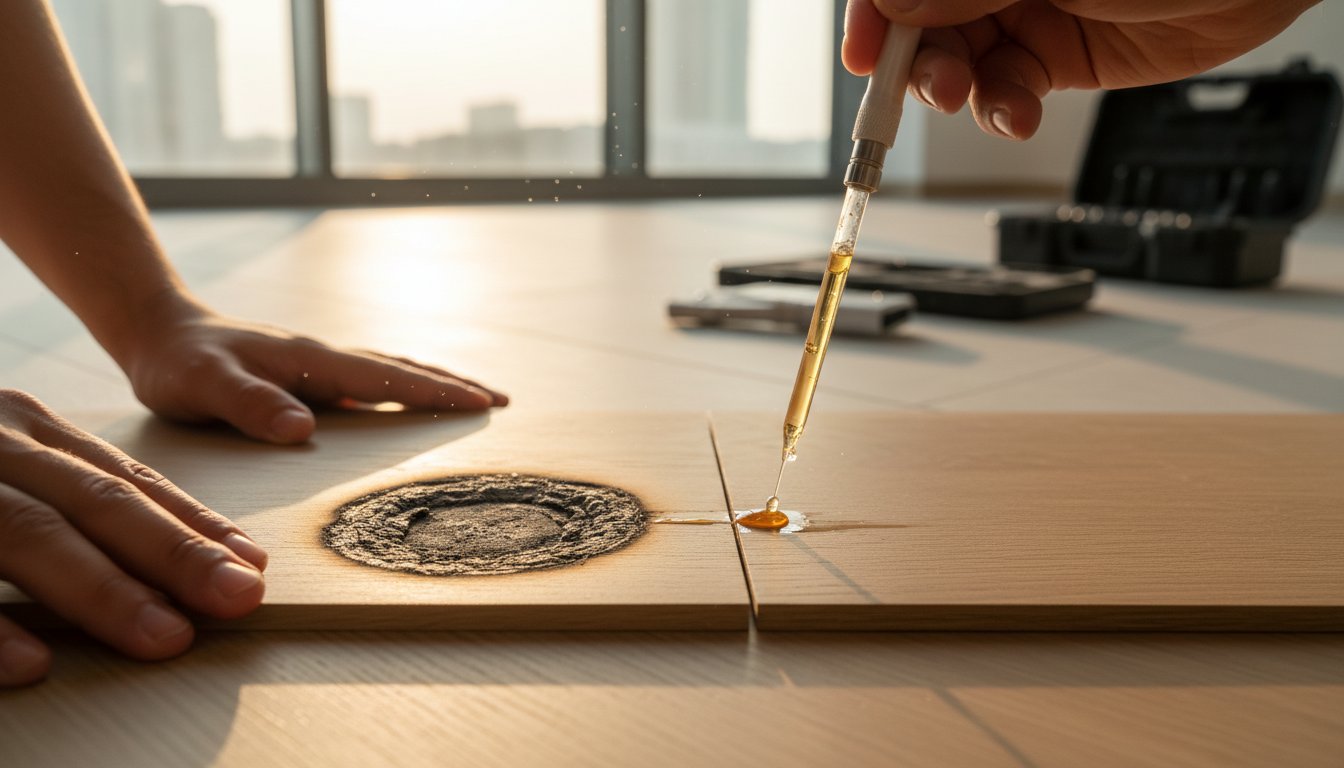
For superficial scorch marks where only the top finish and a thin layer of wood are affected, a meticulous DIY repair is often a viable and cost-effective solution. This process involves carefully removing the damaged material and seamlessly blending a new finish. Following a structured approach is critical to achieving a professional-grade result and avoiding further damage. This guide provides the technical steps to rectify minor heat damage on your hardwood surfaces.
Cleaning and Assessment
Before any abrasive work begins, the first step is to thoroughly clean the affected area. Use a soft, damp cloth with a mild, pH-neutral wood cleaner to remove any surface dirt and residue. This prevents grinding contaminants into the wood grain and provides a clear view of the damage. Once clean, identify the direction of the wood grain, as all sanding must follow this orientation. Ensure the area is completely dry before proceeding to the next stage.
Sanding and Staining Techniques
To effectively fix a burn mark on a wood floor, you must first remove the carbonized wood. Begin by hand-sanding the scorch mark gently with 120-grit sandpaper, always moving with the grain. Focus on “feathering” the edges-applying lighter pressure as you move away from the center of the burn-to create a smooth transition to the undamaged floor. This technique prevents a hard, visible outline. Once the char is gone, switch to a finer 220-grit sandpaper to smooth the raw wood. Apply your matching wood stain in thin, even layers with a clean cloth, allowing each layer to dry and building the color gradually until it matches the surrounding floor.
Sealing the Repair
The final step is to protect the repair by applying a topcoat. The key to an invisible finish is to match the sheen of your existing floor. Choose from the following options:
- Matte: For a flat, non-reflective finish.
- Satin: A popular choice offering a subtle, low-lustre glow.
- Gloss: Provides a high-shine, reflective surface.
Apply the topcoat as directed, and be mindful of the curing time. In Dubai’s high humidity, a polyurethane or varnish finish may take longer to cure fully, so allow ample time before placing furniture or allowing foot traffic. Note that this method is for solid wood; for synthetic surfaces, consult our laminate floor repair guide.
While this process is effective for minor blemishes, deeper burns require specialist fillers and advanced blending techniques. For a guaranteed seamless restoration, contact the expert technicians at The Solution for an assessment.
Professional Restoration: The Solution’s Advanced Methodology
While minor scorches can sometimes be addressed with DIY methods, deep or extensive damage requires professional intervention. For a flawless, permanent result, The Solution employs an advanced methodology designed to restore the surface to its original condition. When you need to fix a burn mark on a wood floor with absolute precision, our technical expertise provides the definitive answer.
Our process begins with an on-site damage assessment by a fully trained technician to determine the extent of the structural compromise. For deep burns that have destroyed the wood fibres, we utilise specialist resins to rebuild the damaged area from within. This is not a superficial patch; it is a structural repair. Our technicians then perform precision colour matching and meticulously hand-paint the wood grain, replicating the original pattern for a truly invisible finish. This advanced system was recently proven at a luxury Dubai hotel, where our team restored severely burned parquet flooring in their main lobby, saving them from a costly and disruptive replacement project.
Innovative Repair Solutions for Hard Surfaces
Our proprietary resins are engineered to mimic the density and thermal expansion properties of real wood, ensuring the repair flexes and endures just like the original material. This technical foundation is paired with the master craftsperson approach of our technicians, who hand-paint intricate grain patterns for a seamless blend. The result is a repair durable enough to withstand the high-traffic demands of commercial areas, from hotel lobbies to retail showrooms.
The Financial Benefit of Restoration
Choosing restoration over replacement offers significant, measurable advantages for businesses and property owners across the UAE. Our clients benefit from:
- Substantial Cost Savings: It is normal practice for our clients to save 50-80% compared to the cost of full floor replacement, often amounting to tens of thousands of dirhams.
- Minimal Disruption: Repairs are completed on-site without the need to vacate the premises, move heavy furniture, or halt business operations, ensuring continuity.
- Sustainability: Repairing is the superior eco-friendly choice for UAE businesses. It prevents landfill waste and reduces the carbon footprint associated with manufacturing and transporting new materials.
Protect your investment and restore your surfaces with minimal impact on your budget and the environment. Request a free damage assessment from The Solution to discover how we can rectify your surface damage.
The Professional Solution for Wood Floor Burn Damage
Rectifying a burn on your wooden flooring requires a clear understanding of the damage, from superficial scorch marks to deep charring. While minor imperfections can sometimes be addressed with careful DIY techniques, a professional assessment is crucial to prevent further harm and ensure a seamless repair. When you need to fix burn mark on wood floor damage that is extensive, specialist intervention is the most effective and reliable path to restoring your surface to its original condition.
At The Solution, our technicians are fully trained in damage assessment and utilise advanced restoration methodologies to rectify even severe burn damage. Trusted by major hospitality and construction firms across the UAE, we deliver exceptional quality while providing savings of 50-80% compared to the costly endeavour of floor replacement. Restore your floors today with Dubai’s premier damage repair specialists and witness the superior results of expert craftsmanship.
Don’t let surface damage diminish the value and beauty of your property. A flawless finish is not just possible-it’s our standard, whether you’re fixing floors or looking to explore Cabinet Refinishing to update your kitchen.
Frequently Asked Questions
Can a deep burn hole in a wood floor truly be made invisible?
Yes, in the hands of a skilled technician, even a deep burn hole can be repaired to an invisible standard. Our specialists do not simply fill the damage; they meticulously rebuild the area using specialist resins and hard-wearing fillers. The final step involves expertly colour-matching and grain-matching the repair to blend seamlessly with the surrounding floor. The result is a flawless finish that fully restores the aesthetic integrity of the surface, making the original damage undetectable.
How much does it cost to fix a burn mark on wood flooring in Dubai?
The cost to fix a burn mark on a wood floor in Dubai typically ranges from 350 د.إ to 800 د.إ, depending on the severity and size of the damage. A precise quotation is provided after a damage assessment. This professional repair presents a significant cost saving, often 50-80% less than the expense of replacing an entire plank or section of flooring. It is the most economical solution for restoring your floor to its original condition.
Will the repair smell or create dust in my home?
Our repair process is designed for minimal disruption. We utilize advanced, low-odour compounds and a contained work method that generates virtually no airborne dust. Unlike full-scale sanding and refinishing, our targeted repairs are clean and efficient. Our technicians ensure the work area is left in the same clean condition as they found it, allowing you to use the space again almost immediately after the repair is complete and fully cured.
How long does a professional wood floor repair take to dry?
The specialist materials we use are formulated for rapid curing. A standard burn mark repair is typically touch-dry within one to two hours and can withstand light foot traffic shortly thereafter. For full hardness and durability, we advise allowing 24 hours before placing heavy furniture or using abrasive cleaning methods on the rectified spot. This ensures the long-term integrity and resilience of the finish, guaranteeing a permanent solution.
Can I use baking soda and vinegar to remove a burn mark?
While DIY methods like baking soda may lighten very superficial scorch marks on the surface finish, they are ineffective for actual burns that have penetrated the wood. These methods can also damage the floor’s sealant and alter the wood’s colour, potentially creating a larger, more noticeable blemish. For a guaranteed and professional result that restores the wood itself, specialist repair techniques are required to rectify the damage permanently and invisibly.
What happens if I sand through the veneer of my engineered wood floor?
Sanding through the thin top veneer of an engineered wood floor exposes the composite core material underneath, which cannot be stained or finished to match the real wood surface. This is irreversible damage through traditional methods and typically necessitates plank replacement. However, The Solution’s technicians can often rectify this type of damage by skillfully rebuilding the surface and recreating the wood grain and colour, saving the plank and avoiding costly replacement.
Does The Solution provide repairs for construction handover inspections?
Yes, we specialize in providing high-quality surface repairs for construction handover inspections. Our technicians are proficient in rectifying snags and defects, including burn marks, scratches, and impact damage, to meet the exacting standards required for project completion. We work efficiently with site managers and contractors across the UAE to ensure all hard surfaces are flawless, preventing costly delays and ensuring a successful handover to the client.
Is the repair permanent, or will it peel off over time?
Our repairs are engineered for permanence. We use high-grade, specialist resins that chemically bond with the wood substrate, effectively becoming an integral part of the floor. The repair is then sealed with a durable, hard-wearing lacquer that protects it from daily wear and tear. Unlike simple fillers, our solution will not shrink, crack, or peel. It is a lasting fix designed to withstand foot traffic, cleaning, and the demands of any residential or commercial environment.


