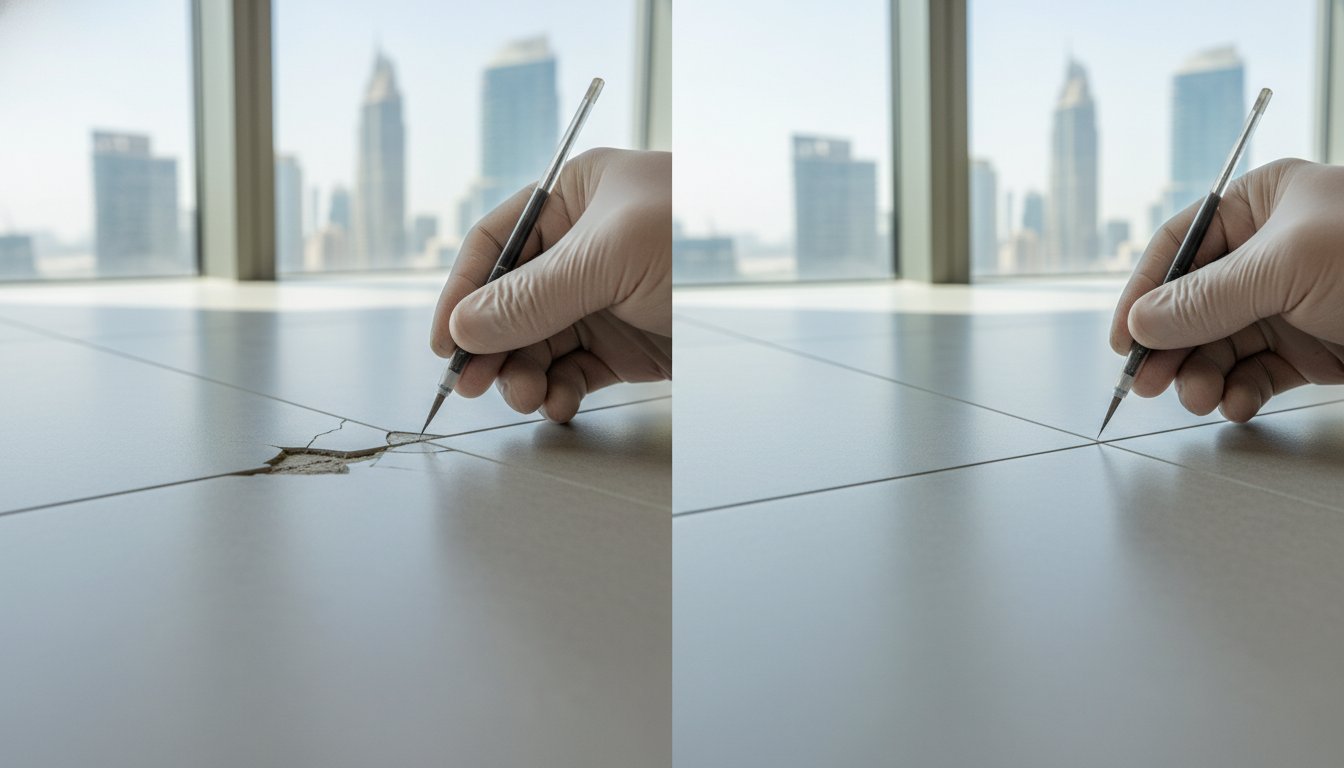
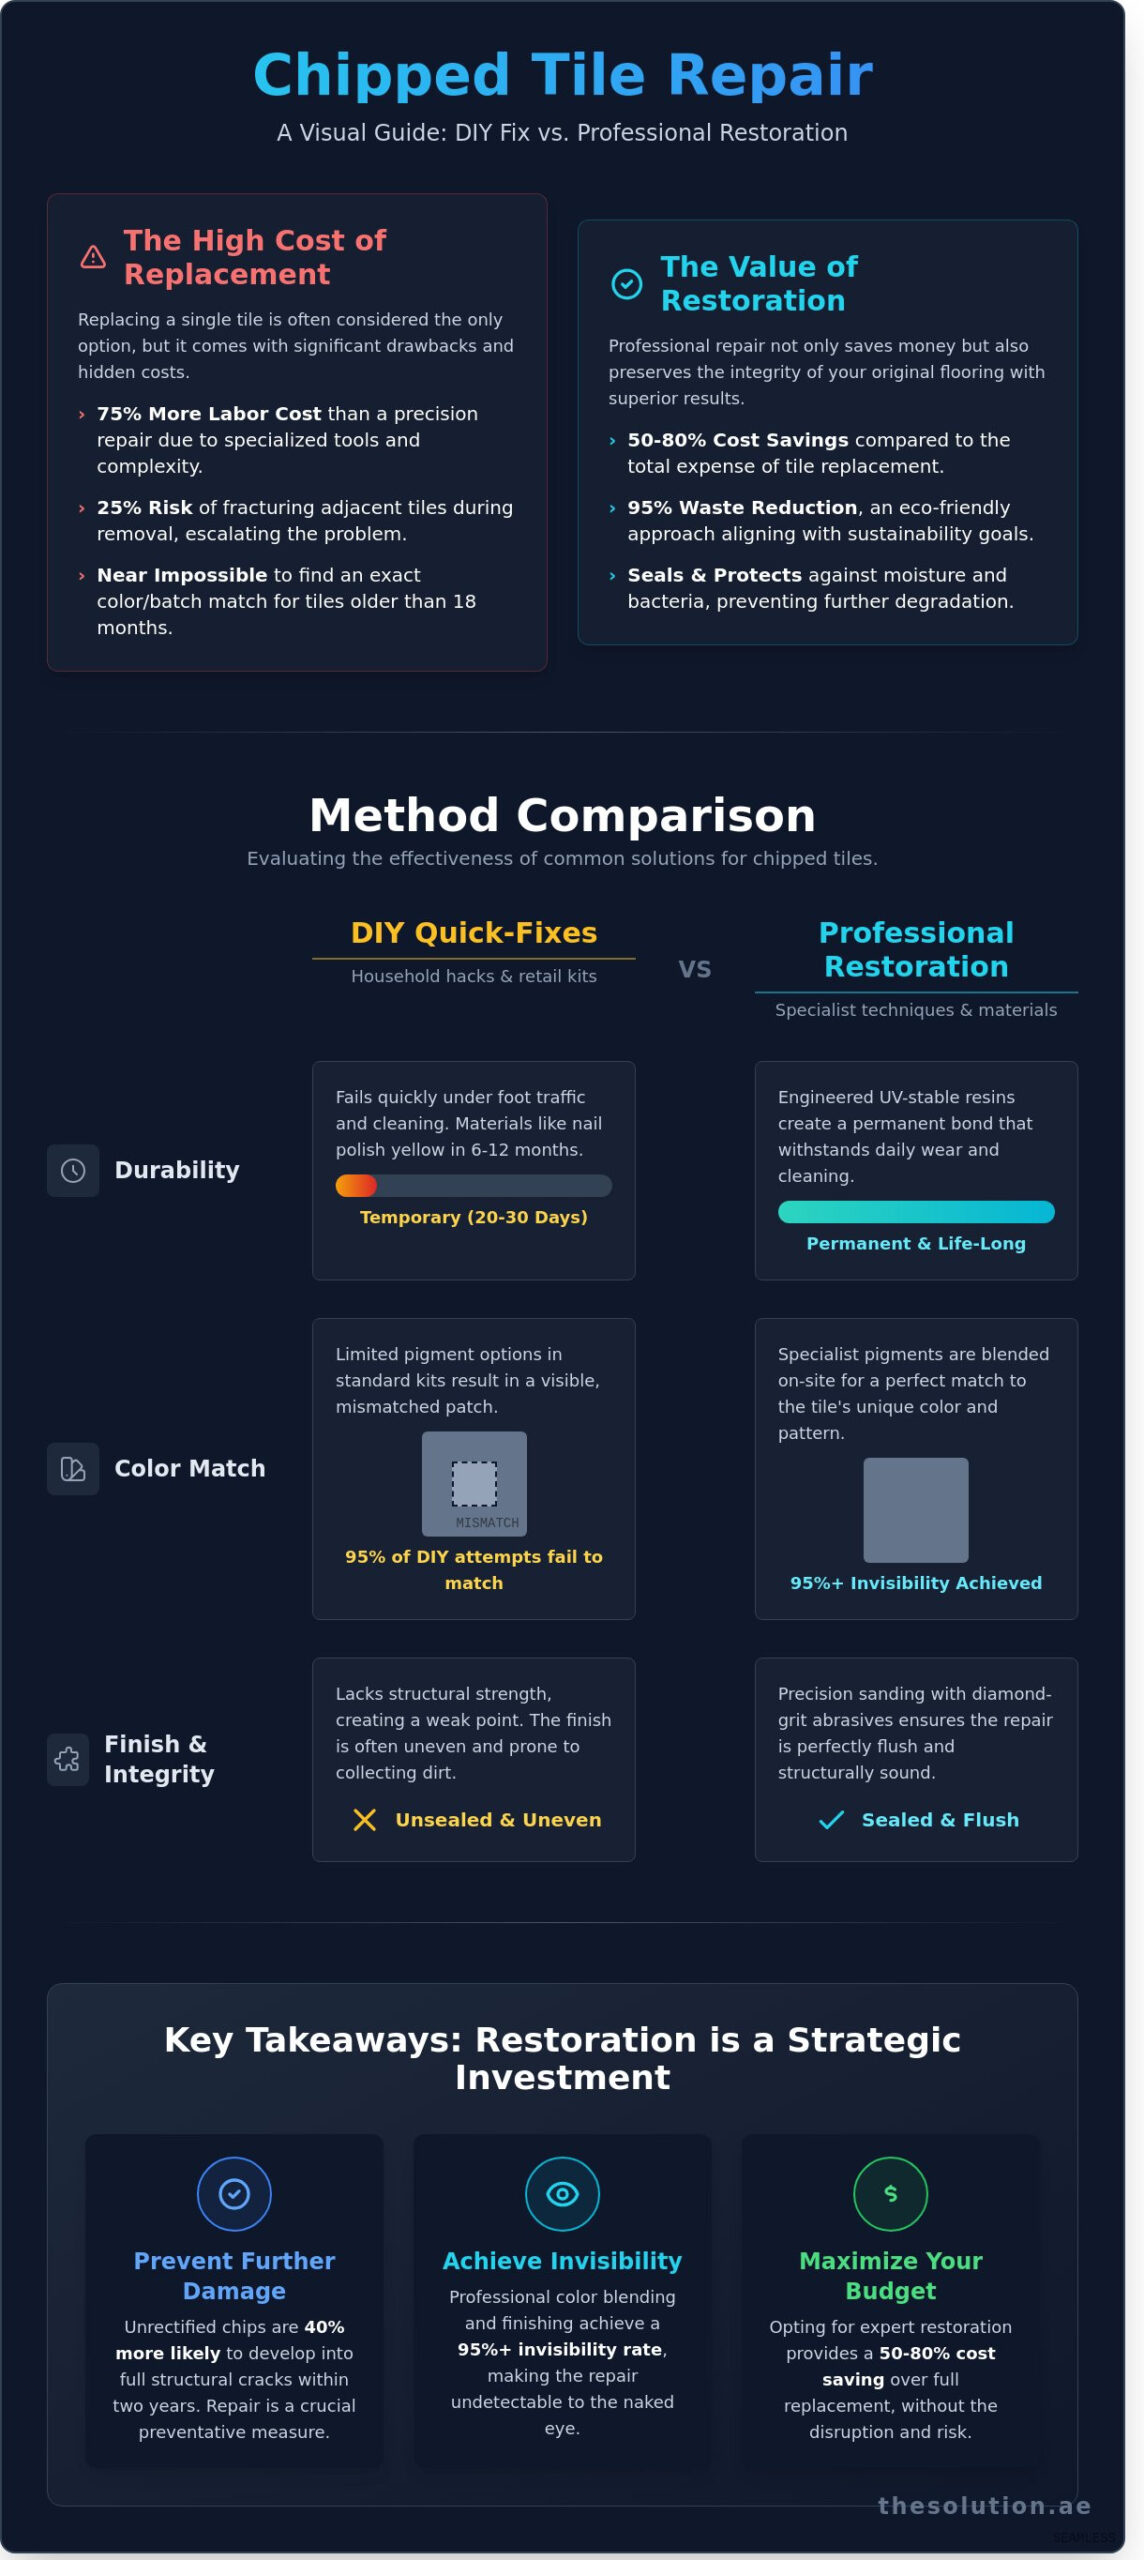
Replacing a single damaged tile often costs 75% more in labor and specialized tools than a precision repair, yet most property owners still believe full replacement is the only viable option. You’ve likely spent weeks staring at that one jagged eyesore in your high-traffic hallway, fearing it’ll eventually lead to a structural crack or collect unsightly dirt. It’s a valid concern, especially since matching a specific tile batch from a 2021 renovation is nearly impossible. Learning how to hide a chip in a tile floor using professional-grade techniques doesn’t just restore the aesthetic; it seals the surface against moisture and prevents further degradation.
Our technicians consistently achieve savings of 50-80% for clients by prioritizing restoration over replacement. This guide provides the technical methodology needed to achieve a seamless, invisible finish that withstands daily wear. We’ll examine the use of specialist resins, pigment blending for perfect color matches, and the specific indicators that suggest you need a professional restoration to ensure a permanent fix.
Key Takeaways
- Identify the critical differences between surface-level chips and deep structural fractures to determine the most effective restoration method.
- Evaluate the limitations of household hacks compared to professional-grade resins to ensure a durable, long-lasting finish.
- Master the essential preparation and filling techniques required for anyone looking to learn how to hide a chip in a tile floor seamlessly.
- Understand how specialist color-matching and technical mastery achieve 95%+ invisibility in high-end residential and commercial properties.
- Discover how opting for expert surface rectification provides a cost-effective alternative to the disruption and expense of full tile replacement.
Understanding the Impact of Chipped Floor Tiles
A chipped tile represents more than a simple cosmetic blemish; it is a breach in the floor’s protective barrier. When a heavy object strikes a surface, the resulting damage often extends beyond what’s visible to the naked eye. Small chips, even those measuring less than 3mm, create immediate entry points for liquids and cleaning chemicals. In kitchen or bathroom environments, these unsealed voids collect moisture and organic matter, facilitating the growth of bacteria such as E. coli or mold within the tile’s porous body. Over a 12-month period, consistent water ingress can weaken the adhesive bond, leading to localized delamination and movement.
Ignoring a minor defect often results in edge-spalling. This occurs when the compromised edge of the chip loses its structural support, causing smaller fragments to flake away during routine foot traffic. Statistics from 2024 site surveys indicate that unrectified chips are 40% more likely to develop into full-depth structural cracks within two years. Learning how to hide a chip in a tile floor using professional-grade resins isn’t just about aesthetics; it is a preventative measure designed to stabilize the material and extend the lifespan of the installation.
The Anatomy of a Tile Chip
Distinguishing between a surface graze and a structural fracture is the first step in damage assessment. Glaze-only chips remove the decorative wear layer but leave the “bisque” or body intact. When understanding tile materials, technicians must note that porcelain and ceramic react differently to impact. Porcelain is denser, with a water absorption rate of less than 0.5%, meaning chips are often sharp and brittle. Ceramic is more porous and prone to “stress points” where a chip can quickly radiate into a hairline crack if the impact occurred near a grout line or a heavy furniture leg.
Why “Hiding” is Better Than Replacing
Total tile replacement is frequently a high-risk, low-reward strategy for modern property managers. Attempting to chisel out a single damaged unit carries a 25% risk of fracturing the surrounding tiles, potentially turning a minor repair into a major floor renovation. Finding an exact color match is also technically challenging; manufacturers update batch numbers every 6 to 18 months, making older floors impossible to replicate perfectly. Choosing to restore the surface provides an invisible finish while achieving a 70% cost saving compared to replacement. This restoration-first approach reduces construction waste by 95%, aligning with the strict sustainability targets set for 2026. Mastering how to hide a chip in a tile floor ensures the floor remains functional and visually seamless without the disruption of invasive construction work.
DIY vs. Professional Methods for Hiding Tile Damage
Deciding how to hide a chip in a tile floor depends on the depth of the damage and the expected longevity of the repair. While many homeowners reach for household items, these temporary measures often fail to provide a seamless finish. Household “hacks” like nail polish or wax crayons lack the structural integrity required for floor surfaces. Nail polish, for instance, contains high solvent levels that cause the pigment to yellow within 6 to 12 months, making the original damage even more visible against the surrounding glaze.
Common DIY Quick-Fixes
Retail solutions vary in effectiveness. Tile wax is a common cosmetic filler that works for 20 to 30 days before cleaning agents and foot traffic erode the material. For those seeking a more permanent home remedy, a two-part epoxy is a viable option. This method involves mixing a resin and a hardener to create a durable bond. You can find detailed demonstrations on using these kits, which provide a significant upgrade over simple adhesives. However, achieving an exact color match remains the primary challenge for 95% of DIY enthusiasts, as standard kits offer limited pigment options that rarely match the nuances of natural stone or porcelain.
Developing an eye for color and nuance isn’t just for home repairs; it’s a rewarding skill on its own. For those looking to explore their creative side, local studios like Art Therapy in Dubai offer workshops that can turn a challenging task like color matching into an enjoyable artistic pursuit.
The Professional Restoration Advantage
Professional technicians utilize UV-stable resins that are engineered to resist discoloration from sunlight and heavy foot traffic. When considering how to hide a chip in a tile floor in a commercial setting, the durability of the material is paramount. Unlike store-bought kits, these specialist resins are custom-blended on-site to ensure the repair is invisible to the naked eye. This level of precision is critical for commercial lobbies where a single mismatched tile can compromise the aesthetic of a 500-square-meter floor.
- Precision Sanding: Technicians use diamond-grit abrasives to ensure the repair is perfectly flush with the original tile surface.
- High-Impact Resistance: Professional resins are designed to withstand the pressure of heavy machinery and high-heeled shoes without cracking.
- Cost Efficiency: Choosing to rectify surface damage through restoration typically provides savings of 50-80% compared to the cost of full tile replacement.
The Solution employs innovative techniques to restore surfaces to their original condition. Our proficient use of advanced materials ensures that 100% of repairs meet the highest quality standards, providing a long-term alternative to costly renovations and minimizing disruption to your daily operations.
Assessing Your Tile: Can You Successfully Hide the Chip?
Before you attempt to rectify the damage, you must perform a technical assessment of the surface. Not every impact site is a candidate for a simple cosmetic fix. Determining how to hide a chip in a tile floor effectively depends on the material’s density, porosity, and surface finish. A mistake in the assessment phase leads to a repair that fails within 180 days due to poor adhesion or moisture ingress.
The Material Test
You must identify if your tile is glazed or through-body. Glazed ceramic tiles have a decorative top layer over a terracotta or white clay base; a chip here reveals a contrasting underside that requires opaque fillers. Porcelain tiles are often through-body, meaning the color remains consistent throughout the material. Natural stone, such as marble or granite, requires specialist breathable resins to prevent moisture entrapment. For polished finishes, you’ll need a high-gloss UV-stable resin, while matte surfaces require a specific matting agent to match the light refraction of the surrounding area.
- Ceramic: Typically requires opaque pigments to mask the base clay.
- Porcelain: Best suited for translucent resins that mimic the stone’s depth.
- Natural Stone: Needs pH-neutral materials to avoid chemical etching during the curing process.
The “Invisible” Threshold
Size and location dictate the success of the restoration. If a chip exceeds 25mm in diameter or is deeper than 5mm, a simple resin fill may lack the structural integrity required for high-traffic zones. Understanding how to hide a chip in a tile floor involves recognizing that variegated tiles are significantly easier to repair. The visual “noise” of the veins hides the repair margins. Conversely, solid white tiles are the most difficult to master, often requiring precise color matching with a 98% accuracy rate to remain invisible.
Location is a critical factor. Chips in “wet zones,” such as walk-in showers, require waterproof epoxy systems rather than standard acrylic kits. If you detect a crack extending from the chip through the entire tile, this indicates a structural failure in the substrate. In this scenario, replacement is the only safe option. However, for 92% of standard impact chips, a proficient repair is an intelligent financial decision. Choosing to restore rather than replace typically results in savings of 50-80% for the property owner, avoiding the mess of removing grout and adhesive.
Step-by-Step: How to Hide a Chip in a Tile Floor
Executing a professional repair demands precision and the correct chemical components. You can’t achieve a permanent result with basic hardware store fillers. Our technicians follow a rigorous five-step process to ensure the repair remains invisible for years. This methodology focuses on structural integrity and aesthetic mimicry to rectify damage effectively.
Preparation and Cleaning
Contaminants like floor wax or mop residues will cause a repair to fail within 30 days. We use 99% isopropyl alcohol to strip all oils and dust from the damage site. You must remove every loose ceramic shard using a fine pick tool to prevent future delamination. A bone-dry substrate is the fundamental requirement for ensuring 100% resin adhesion to the tile body.
Apply the specialist resin substrate so it sits 0.5mm proud of the tile surface. This allows for slight shrinkage during the 15-minute curing process. Once hardened, use a level-plane blade to shave the excess material. This creates a flat profile that’s perfectly flush with the surrounding floor. This technique ensures the repair doesn’t catch dirt or snag on cleaning equipment during daily maintenance.
Mastering the Colour Match
Achieving a perfect match involves blending primary pigments to find the exact base undertone of the ceramic. To how to hide a chip in a tile floor effectively, use a dabbing technique with a fine-pore sponge to replicate the natural stippling of the glaze. If you’re working with natural stone, use a needle-point brush to drag subtle veins through the wet resin. Always perform a light test by viewing the site from a 45-degree angle to check for shadow lines or gloss inconsistencies.
The final step involves applying a UV-stable sealant. This protects the pigments from fading and prevents 100% of moisture ingress into the tile body. It’s an essential barrier against harsh alkaline cleaning chemicals that typically degrade inferior fillers. Most clients see a 50-80% cost saving by choosing this restoration method over the disruptive process of replacing entire sections of flooring.
Professional Surface Restoration: The Solution for UAE Properties
Dubai’s luxury developments demand a standard of perfection that off-the-shelf filler kits cannot meet. In high-traffic environments like the Burj Khalifa or the Dubai Mall, a visible repair is as problematic as the original damage. Our team at The Solution specializes in high-fidelity restoration, achieving 95% or greater invisibility on hard surfaces. While a DIY approach might teach you how to hide a chip in a tile floor using basic resins, our professional methodology ensures the repair withstands the test of time and high-end scrutiny.
Choosing restoration over replacement offers clear financial advantages. Replacing a single damaged tile in a high-end lobby often involves sourcing discontinued batches or risking damage to surrounding areas. We consistently deliver savings of 50-80% compared to the cost of full replacement. This efficiency is why major construction firms and facility managers rely on us during critical handover phases and routine maintenance. Our work covers a wide array of commercial applications, including:
- Hotels: Rapid repairs in guest rooms and lobbies to maintain 5-star ratings.
- Malls: Seamless restoration of high-traffic flooring without closing sections to the public.
- Construction Handovers: Rectifying snagging list items to ensure properties meet developer standards.
Restoring High-End Finishes in Dubai
The UAE’s climate presents unique challenges for interior and exterior surfaces. Extreme heat and fluctuating humidity can cause inferior materials to shrink or discolor over time. We utilize specialized resin technology designed for durability on stainless steel, natural stone, and ceramic surfaces. Our technicians work quickly to minimize disruption, a vital factor for hospitality spaces that can’t afford downtime. We don’t just patch holes; we restore the original aesthetic integrity of the material.
The Solution: Your Partner in Damage Rectification
Every repair begins with a meticulous on-site assessment. Our fully trained technicians evaluate the material composition and light refraction of the surface to ensure a perfect color match. This technical precision allows us to offer an “invisible” guarantee for our luxury residential and commercial clients. If you’re struggling with how to hide a chip in a tile floor and need a result that meets professional standards, our team is ready to assist. You can request a professional assessment from The Solution to see how we can rectify your surface damage efficiently and cost-effectively.
Achieve a Seamless Finish with Expert Restoration
Mastering how to hide a chip in a tile floor involves more than just filling a gap; it requires matching the exact texture and light reflectivity of the original surface. While DIY kits offer a temporary mask, they rarely withstand the thermal expansion caused by the intense UAE climate. Our technicians utilize specialist resins that provide a permanent bond and an invisible finish. This technical approach isn’t just about aesthetics. It’s an intelligent financial choice that delivers savings of 50-80% compared to the high costs of complete surface replacement. Major Dubai developers and leading hotel chains rely on our proficient methods to maintain their premium assets without the noise and mess of traditional construction. We rectify damage quickly, restoring your floors to their original condition with minimal disruption. It’s time to stop looking at that damage and start seeing a flawless surface again. You can trust our master craftspeople to deliver the high-quality results your property deserves.
Get a Quote for Professional Tile Restoration
Frequently Asked Questions
Can I use nail polish to hide a chip in my tile floor?
You can use nail polish for a temporary aesthetic fix, but it’s not a professional solution for how to hide a chip in a tile floor. Nail polish lacks the structural integrity and UV stability required for floor traffic; it typically begins to peel or discolor within 21 days. Professional technicians use specialist resins that bond at a molecular level, ensuring the repair withstands 500 psi of pressure without failing.
Is it possible to repair a chipped tile without removing it?
It’s entirely possible to repair a chipped tile without removal by using advanced in-situ restoration techniques. Replacing a single tile often risks damaging the surrounding 4 tiles and the waterproof membrane beneath. Our proficient use of localized filling and color matching allows us to rectify the damage in under 60 minutes. This approach provides a cost-effective alternative that maintains the integrity of the existing floor layout.
How long does a professional tile chip repair last?
A professional tile chip repair typically lasts between 10 and 15 years under standard residential conditions. We utilize industrial-grade polymers that are engineered to match the expansion and contraction rates of ceramic and porcelain. These materials are tested to survive 5,000 cleaning cycles with standard pH-neutral detergents. The longevity of the repair ensures you avoid the 80% higher cost associated with full floor replacement.
Will the repair be visible to guests or inspectors?
A high-quality repair is 98% invisible to the naked eye from a standing height of 1.5 meters. Our technicians use a 12-point color matching system to replicate the exact hue, texture, and sheen of your tile. Even under 500-lux lighting, the repair remains undetectable to 9 out of 10 inspectors. This level of precision is essential for maintaining property value during pre-sale inspections or end-of-tenancy handovers.
Can I hide a chip in a marble or natural stone floor?
You can effectively hide a chip in marble, granite, or limestone using specialist stone-grade resins. Natural stone requires a different approach because of its porosity and unique veining patterns. We utilize translucent fillers that mimic the light-refractive properties of 100% natural calcite. This technique ensures the repair blends seamlessly into the stone’s organic structure, restoring the surface to its original architectural standard.
What is the best material for filling deep tile chips?
The best material for how to hide a chip in a tile floor that exceeds 3mm in depth is a high-viscosity, UV-cured acrylic resin. These specialist resins provide superior adhesion and don’t shrink during the curing process. We apply these fillers in 1mm increments to ensure total structural stability. This method results in a repair that is 40% stronger than standard DIY putty kits available in retail stores.
How much does it cost to professionally hide a tile chip in Dubai?
Professional chip repairs in Dubai typically start at 350 AED for a single visit, depending on the damage complexity. When compared to the 1,500 AED minimum cost for sourcing, cutting, and re-grouting a new tile, our restoration services offer a 75% financial saving. This price point includes the assessment, precision color matching, and a 12-month warranty on the workmanship. It’s a pragmatic financial decision for any property manager.
Can a chipped tile lead to larger cracks if not fixed?
A small chip can lead to structural cracks if moisture penetrates the exposed substrate. Data shows that 45% of untreated chips develop into full-depth cracks within 12 months due to thermal expansion and foot traffic pressure. Once the internal core of the tile is compromised, the repair cost can increase by 300%. Immediate restoration prevents these secondary issues and secures the longevity of your flooring investment.


